2021 ver. Spring boot 를 이용한 AWS Rekognition
AWS 를 이용하면서 가장 곤혹스러운 점은 AWS 기능이 업데이트를 함에 비해서 개발 가이드는 제대로 업데이트하지 않는다는 점이다.
때문에 1년 반만 지난 포스팅을 참고해도 안되는 경우가 부지기수다.
Amazon Rekognition Setup and Demo Using Java 라는 유튜브를 참고하여 구현하다가 보기 좋게 실패하였다.
다행스럽게도 내 주위에 AWS 를 매우 많이 사용하는 동기이자 선생님께서 다양한 팁과 도움을 주어 Rekognition 기능을 사용해볼 수 있었다.
내 기억력을 믿지 못해 어떻게 구현했는가를 적어보고자 한다.
S3 버킷 생성

가장 먼저 이미지가 저장될 S3 버킷을 생성해준다.

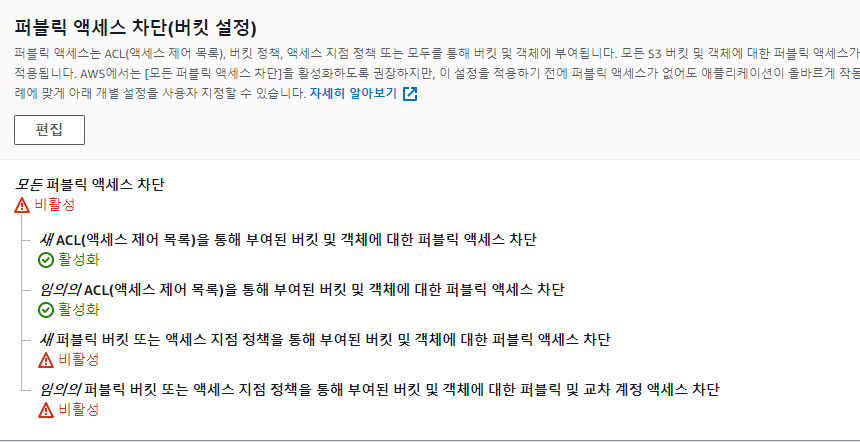
보안을 위해
- 새 ACL(액세스 제어 목록)을 통해 부여된 버킷 및 객체에 대한 퍼블릭 액세스 차단
- 임의의 ACL(액세스 제어 목록)을 통해 부여된 버킷 및 객체에 대한 퍼블릭 액세스 차단
두가지를 활성화를 해준다.

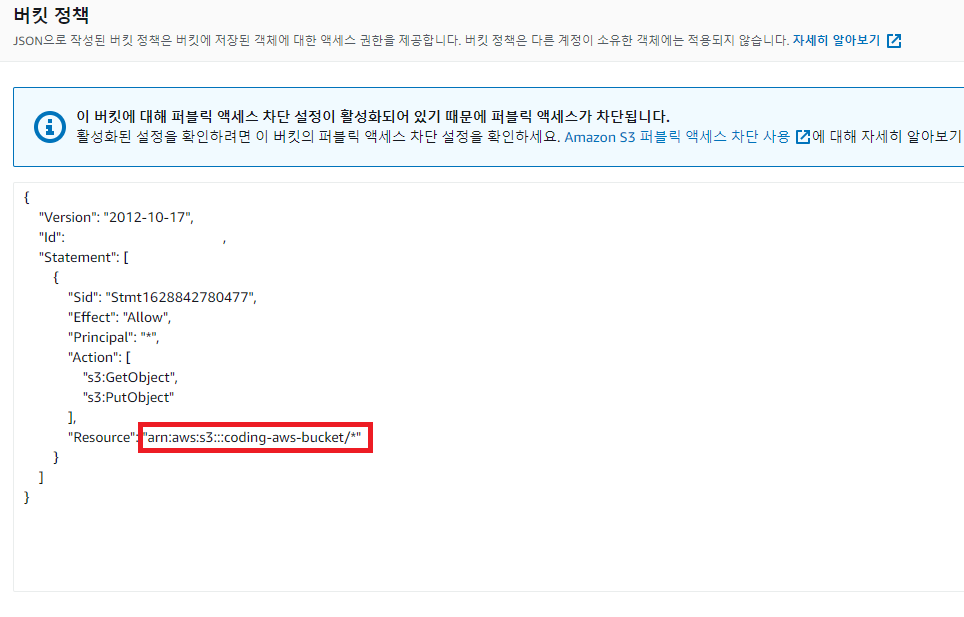
버킷 정책의 편집을 누르고 정책 생성기를 통해 정책을 생성한다.
이 때 자신의 버킷 ARN 이 나오는데 본인의 ARN 뒤에 ‘/*’ 를 붙여줘야한다.
만약 붙이지 않는다면 에러가 나니 조심하자.
IAM 설정

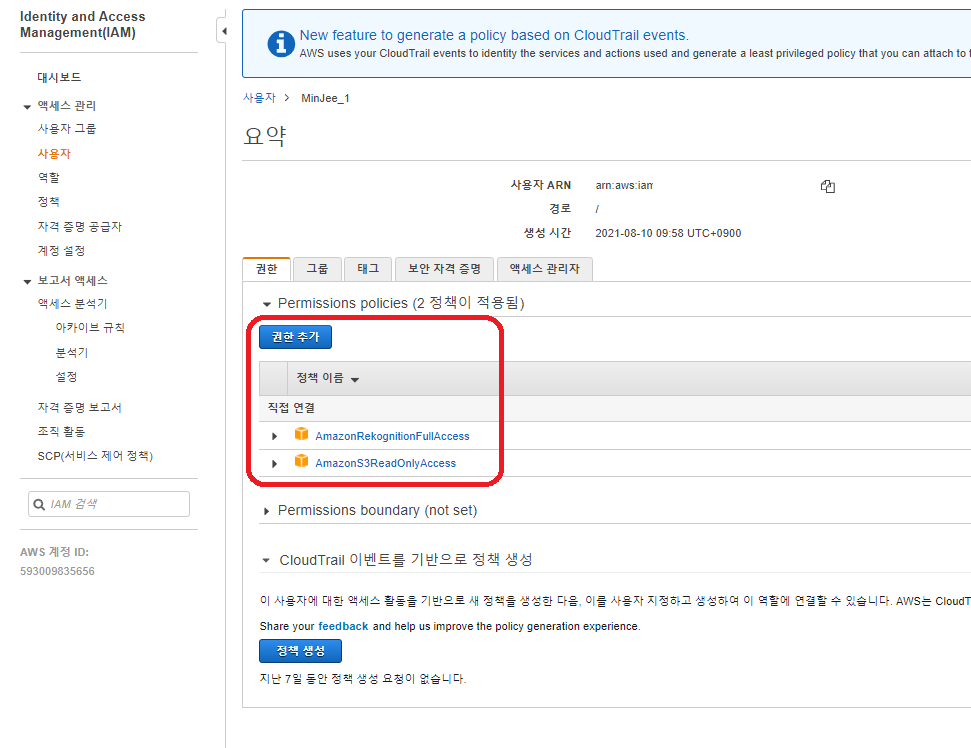
사용자의 권한을 추가해주자
Amazon S3 버킷에서 이미지 분석 을 참고하자면
- AmazonRekognitionFullAccess
- AmazonS3ReadOnlyAccess
만 추가해주면 된다.
Spring
스프링 부트에서 스프링 프로젝트를 생성한다.
pom.xml
<dependency>
	<groupId>com.amazonaws</groupId>
	<artifactId>aws-java-sdk</artifactId>
	<version>1.11.256</version>
	<scope>compile</scope>
</dependency>
<dependency>
      <groupId>com.amazonaws</groupId>
      <artifactId>amazon-kinesis-client</artifactId>
      <version>1.2.1</version>
      <scope>compile</scope>
</dependency>
application.properties
cloud:
  aws:
    credentials:
      access-key: IAM 사용자의 액세스 키
      secret-key: IAM 사용자의 액세스 키와 동봉되는 시크릿키
	s3:
      bucket : S3 버킷 이름
    region:
      static : S3 버킷 창에 보이는 AWS 리전
	stack:
      auto : false
AmazonS3Config.java
package com.example.demo;

import com.amazonaws.auth.AWSStaticCredentialsProvider;
import com.amazonaws.auth.BasicAWSCredentials;
import com.amazonaws.services.s3.AmazonS3Client;
import com.amazonaws.services.s3.AmazonS3ClientBuilder;
import org.springframework.beans.factory.annotation.Value;
import org.springframework.context.annotation.Bean;
import org.springframework.context.annotation.Configuration;

@Configuration
public class AmazonS3Config {

    @Value("${cloud.aws.credentials.access-key}")
    private String accessKey;

    @Value("${cloud.aws.credentials.secret-key}")
    private String secretKey;

    @Value("${cloud.aws.region.static}")
    private String region;

    @Bean
    public AmazonS3Client amazonS3Client() {
        BasicAWSCredentials awsCreds = new BasicAWSCredentials(accessKey, secretKey);
        return (AmazonS3Client) AmazonS3ClientBuilder.standard()
                .withRegion(region)
                .withCredentials(new AWSStaticCredentialsProvider(awsCreds))
                .build();
    }
}
Demo.java
package com.example.demo;

//Copyright 2018 Amazon.com, Inc. or its affiliates. All Rights Reserved.
//PDX-License-Identifier: MIT-0 (For details, see https://github.com/awsdocs/amazon-rekognition-developer-guide/blob/master/LICENSE-SAMPLECODE.)

import com.amazonaws.services.rekognition.AmazonRekognition;
import com.amazonaws.services.rekognition.AmazonRekognitionClientBuilder;
import com.amazonaws.services.rekognition.model.AmazonRekognitionException;
import com.amazonaws.services.rekognition.model.DetectLabelsRequest;
import com.amazonaws.services.rekognition.model.DetectLabelsResult;
import com.amazonaws.services.rekognition.model.Image;
import com.amazonaws.services.rekognition.model.Label;
import com.amazonaws.services.rekognition.model.S3Object;
import java.util.List;

public class Demo {

 public static void main(String[] args) throws Exception {

    String photo = "image.jpg"; // S3에 미리 저장해둔 이미지
    String bucket = "bucket name"; // 본인의 S3 버킷 이름


//    AmazonRekognition rekognitionClient = AmazonRekognitionClientBuilder.defaultClient();
    AmazonRekognition rekognitionClient = AmazonRekognitionClientBuilder.standard().withRegion("S3 버킷 창에 보이는 AWS 리전").build();


    DetectLabelsRequest request = new DetectLabelsRequest()
         .withImage(new Image()
         .withS3Object(new S3Object()
         .withName(photo).withBucket(bucket)))
         .withMaxLabels(10)
         .withMinConfidence(75F);

    try {
       DetectLabelsResult result = rekognitionClient.detectLabels(request);
       List <Label> labels = result.getLabels();

       System.out.println("Detected labels for " + photo);
       for (Label label: labels) {
          System.out.println(label.getName() + ": " + label.getConfidence().toString());
       }
    } catch(AmazonRekognitionException e) {
       e.printStackTrace();
    }
 }
}
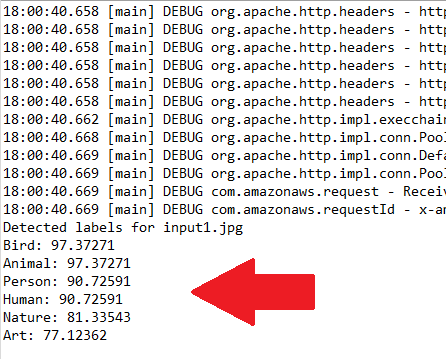
성공 화면

비고
만약 aws 기능을 이용하는데 깃허브에 자신의 프로젝트를 올릴땐 매우 조심하자
.gitignore 에 비밀번호가 포함되는 application.properties 를 추가하여 절대로 보안상 문제가 없도록 해야한다.
댓글남기기